The Web Report Designer itself is a web component written in React. React components are an excellent way to implement component architecture into a UI. To do this, however, you have to forget some of the things you’ve learned before, such as the separation of Javascript and markup code. React components consist of Javascript code, HTML and sometimes CSS. They are self-contained and can be controlled via properties. Since a React component in the classic MVC way of thinking only covers the View part, the question is how the global state should be actually managed. At the same time, the objects’ states on the Javascript client side should be kept as simple as possible. Therefore, we were looking for a cross-component “state administration”.
We evaluated a range of different approaches and possibilities to achieve that:
- Administration via the browser’s localStorage
- Administration via a global Javascript object
- MobX which implements the observer pattern
- Redux which implements the flux pattern
localStorage
This option of implementation was discarded very quickly, simply because it meant that the States would have been stored persistently on the client, which would have contradicted our implementation approach.
Global Javascript object
Due to the complexity of individual objects such as data sources, lists, objects, variables or functions used in List & Label, this approach did not seem appropriate either.
MobX
MobX is based on a powerful concept: the consistent implementation of the “Observable” pattern while dealing with State. Classes are created in Javascript and marked as “Observable”, using decorators or hooks. Should a value change within this class, a callback is brought up automatically in order to react to this change.
Further information and a small example can be found on MobX’ homepage.
However, we did not follow through with this option either, mainly because Redux or the Redux Toolkit had already been used successfully in the Report Server, and we did not want to rely on any new or different technology here.
Redux
Redux, or better the Flux architecture, is a structure first used by Facebook in 2013 in connection with React.
Facebook considered two important concepts here:
- There can only be one “source of truth” – it is important that the global state is not mixed up with the internal state of a component.
- Changes to the store should never happen directly, but always through so-called “Actions”
These concepts determine the architecture of Flux:

Actions
Actions are regular Javascript objects that consist of at least one “type” attribute. This allows stores to recognize whether it is a relevant action for you.
Dispatcher
A dispatcher receives an action and distributes it to the stores.
Stores
The actual application logic is managed within the stores. Stores “listen” to the actions coming from the dispatcher. If an action is recognized as relevant for the store, it has the ability to change the store. Then, the store notifies the React components of the change, and it becomes visible to the user.
View
The View is the application part visible to the user, which in turn triggers the various actions via the action / dispatcher.
Redux Toolkit
Due to the structure of Redux being relatively complex, the “Redux Toolkit” was picked for easier administration.
With “Redux Toolkit”, another store component can be quickly and easily created using the “createSlice” method – without large overhead that normally results from Redux. The following is the complete implementation of the “Hotkey” store:
import { createSlice, PayloadAction } from "@reduxjs/toolkit";

export interface OverwriteBaseHotkeysObject {
	OverwriteBaseHotkeys: boolean,
	NewProviderId: string,
}

export interface HotkeysState {
	OverwriteBaseHotkeys: boolean,
	CurrentCustomProvider: string,
}

const initialState: HotkeysState = {
    OverwriteBaseHotkeys: false,
    CurrentCustomProvider: '',
}

const HotkeysSlice = createSlice(
    {
		name: 'Hotkeys',
        initialState,
        reducers: {
            setOverwriteBaseHotkeys(state, { payload }: PayloadAction<OverwriteBaseHotkeysObject>) {
                state.OverwriteBaseHotkeys = payload.OverwriteBaseHotkeys;
                state.CurrentCustomProvider = payload.NewProviderId;
            },
            resetHotkeys(state) {
                state.OverwriteBaseHotkeys = initialState.OverwriteBaseHotkeys;
                state.CurrentCustomProvider = initialState.CurrentCustomProvider;
            }
        }
    });

export const {
    setOverwriteBaseHotkeys,
    resetHotkeys
} = HotkeysSlice.actions;

export const HotkeysReducer = HotkeysSlice.reducer;
Code language: JavaScript (javascript)
First of all, the interface definitions, i.e. the variables of the store, are created. Then, the initial values are being determined. The reducers are the “Actions” which can be used later by the dispatcher.
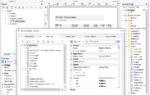
In order to get an insight into the Web Report Designer Store’s complexity, here’s a look at it. Within the Web Report Designer, the store has been divided into several “sub – Stores” in order to make it easier. There are currently 8 “Sub – Stores” being used:

- PropertyGridDefinition-Store: it manages all States that have to do with an object’s properties. Each of them is linked to an object in the Designer:

Right there, all required information of an object’s individual properties can be accessed, such as PropertyName, DisplayName, which editor it is, which values are allowed for this property, the possible values for a dropdown or a list, as well as the information whether “formulas” are supported for this property.
2. Config-Store: manages all states required for backend communication.
3. UI store: manages all states required for the UI, such as selected objects or windows, the zoom factor or which hotkeys are currently available.
4. Localization store: manages language administration for the current instance. To do this, a hash comparison starts when the Web Report Designer is called, in order to check whether the current resources match the selected language. This store also keeps the information in local storage to make it available across sessions.
5. SVG Store: saves all SVG objects for the respective List & Label objects – then they can be displayed in the layout.
6. History store: saves the past and future objects for the “Undo” or “Redo” feature. If an object has been changed, a “dispatch” to this store is automatically triggered and saves the current object.
7. Project Store: the actual List & Label project file. This store reflects the object model of a List & Label project file and contains all information about the individual objects:

8. EvaluationManager-Store: saves all formulas already evaluated by the backend, in order to minimize the number of requests to the backend.
During the implementation, it turned out that – due to the complexity of the store – classic access via the “useSelector (…)” hook was extremely complicated, since you’d have to know the complete path in the store. To access a single object, for example, you’d have to know the path “state.project.Objects” and then filter the array. As a workaround, we decided to write custom hooks for various store components.
As an example: the hook “useObjects” was written to access the objects:
export const useObjects = (): ObjectsState => {
    const { PrefetchedObjects, ObjectsList, ShowDeleteConfirmation, ObjectError, DeleteObjectError, ObjectsFetching, AssignLayerToObjectsError } = useSelector((state: ApplicationState) => state.project.Objects);
    return { PrefetchedObjects, ObjectsList, ShowDeleteConfirmation, ObjectError, DeleteObjectError, ObjectsFetching, AssignLayerToObjectsError };
};
Code language: JavaScript (javascript)
Various hooks were also written to access the various variables and report parameters:
export const useSumVariables = (): SumVariablesState => {
    const { SumVariablesList, SumVariablesError } = useSelector((state: ApplicationState) => state.project.SumVariables);
    return { SumVariablesList, SumVariablesError };
};

export const useUserVariables = (): UserVariablesState => {
    const { UserVariablesList, UserVariablesError } = useSelector((state: ApplicationState) => state.project.UserVariables);
    return { UserVariablesList, UserVariablesError };
};

export const useReportParameters = (): ReportParametersState => {
    const { ReportParametersList, ReportParametersError, InitialReportParameterList } = useSelector((state: ApplicationState) => state.project.ReportParameters);
    return { ReportParametersList, ReportParametersError, InitialReportParameterList };
};

export const useVariablesFields = (): VariablesFieldsState => {
    const { VariablesFieldsFetched, VariablesFieldsList, VariablesFieldsLastID, VariablesFieldsError } = useSelector((state: ApplicationState) => state.project.VariablesFields);
    return { VariablesFieldsFetched, VariablesFieldsList, VariablesFieldsLastID, VariablesFieldsError };
};
Code language: JavaScript (javascript)
The Web Report Designer’s code became very clear – developers only need to remember the individual hooks whenever they want to access a store object. This resulted in significant time savings.
Drag & Drop
In the very beginning of the Drag & Drop implementation, an analysis was made, and the following requirements were defined:
- Both, desktop browsers and mobile devices, must be supported.
- Same “look and feel” as in the Windows desktop version.
- Support of drop zones for later features. Objects must be resizable
Due to complexity, inhouse implementation of those functions has been discarded at a very early stage. Instead, we were looking for a suitable package that met our requirements. The “react-dnd” package supported our requirements particularly well, since it already had additional packages for mobile devices on board. To support the resizability, the NPM package “react-resizable” was set.
The complete “Design Space” is managed by these two NPM packages in the Web Report Designer. For that, a basic component was first created, in which all objects from the “Design Space” can be rendered and changed by using callbacks:
...
    return (
        <React.Fragment>
            <Rnd
                ref={rndRef}
                key={Item.InternalId}
                style={{
                    position: 'absolute',
                    left: "auto !important",
                    top: "auto !important",
                    overflow: "hidden",
                    outline: onDragState ? `${themeContext.designSpace.DesignSpaceObjectDraggedOutlineStyle}` : ActiveObject !== undefined && Item.InternalId === ActiveObject.ID ? `${themeContext.designSpace.DesignSpaceObjectActiveOutlineStyle}` : "",
                    cursor: (SVGObject?.ObjectSVGError?.HasError || actionError || showReportContainerAsTable) ? 'default' : ActiveObject !== undefined && Item.InternalId !== ActiveObject.ID ? 'pointer' : (Prefetched ? 'pointer' : 'move'),
                    zIndex: ActiveObject !== undefined && Item.InternalId === ActiveObject.ID ? 99 : 2,
                }}

                default={{
                    x: left,
                    y: top,
                    width: width,
                    height: height,
                }}
                position={{ x: left, y: top }}
                size={{
                    width: width,
                    height: height,
                }}

                // grid settings raster
                dragGrid={!canRepositionObject ? [0, 0] : (ProjectOptions?.Layout.Grid.Snap === "True" ? [gridSpacingHorizontal, gridSpacingVertical] : [1, 1])}
                resizeGrid={ProjectOptions?.Layout.Grid.Snap === "True" ? [gridSpacingHorizontal, gridSpacingVertical] : [1, 1]}

                onClick={onClick}
                onDrag={!onResizeState ? onDrag : undefined}
                onDragStop={!onResizeState ? onDragStop : undefined}
                onDragStart={!onResizeState ? onDragStart : undefined}
                dragHandleClassName={`dragHandle_${Item.InternalId}`}

                onResize={onResize}
                onResizeStop={onResizeStop}

                disableDragging={Prefetched || (ActiveObject !== undefined && Item.InternalId !== ActiveObject.ID) || !canRepositionObject || SVGObject?.ObjectSVGError?.HasError || actionError || showReportContainerAsTable}
                enableResizing={!Prefetched && ActiveObject !== undefined && Item.InternalId === ActiveObject.ID && !SVGObject?.ObjectSVGError?.HasError && !actionError}
            >
...
Code language: JavaScript (javascript)
The next chapter of our adventures including the challenges thrown at us – especially regarding “back-end queries”, “hotkeys” and “editor”, will soon follow in the last part of this series.

Benjamin works as a full stack developer at combit. In addition to being a part of the dev team, he is also involved in vocational training. In his free time, he engages for the volunteer fire department.