With version 28, we now support email delivery via Microsoft Graph. This gives you a future-proof method to send your email.

It is extremely easy to use. All you need are the new DLLs …
- combit.ListLabel28.MailExtensions_x86.dll / combit.ListLabel28.MailExtensions_x64.dll (depending on the bitness of your application)
- combit.ListLabel28.GraphMailExtension.dll
… as well as some assemblies under the MIT License or the Microsoft .NET Library License. These modules are located in the “\Miscellaneous\Optional Modules Under OSI Licenses\Mail Extensions” folder of the List & Label installation.
Next, set the shipping provider to “GRAPH” in order to use the new feature, and pass on the additional information required for authentication. Here’s a small .NET example using the MailJob class:
MailJob mailJobLL = new MailJob();
mailJobLL.Provider = "GRAPH";

mailJobLL.AdditionalOptions.Add("Graph.AuthType", "3");  // use bearer token authentication
mailJobLL.AdditionalOptions.Add("Graph.ClientId", "697517f7-70dd-4ef9-8a5c-xxxxxxxxxxxx"); // client id of the app
mailJobLL.AdditionalOptions.Add("Graph.TenantId", "fe0ef3d4-0076-4c1f-9b6c-xxxxxxxxxxxx"); // azure domain
mailJobLL.AdditionalOptions.Add("Graph.RedirectUri", "msal697517f7-70dd-4ef9-xxxxxxxxxxxx://auth"); // redirect here
mailJobLL.AdditionalOptions.Add("Graph.UserName", "<Your Graph Username>"); // we either need user name or user object id
mailJobLL.AdditionalOptions.Add("Graph.UserObjectId", "34567890-3456-3456-3456-xxxxxxxxxxxx"); // we either need user name or user object id
mailJobLL.AdditionalOptions.Add("Graph.BearerToken", "xxxxxxxxxxxx"); // and of course the promised token that we previously acquired

mailJobLL.From = "<From>";
mailJobLL.To = "<To>";
mailJobLL.Subject = "My Test Message";
mailJobLL.BodyHtml = File.ReadAllText(@"C:\temp\mailcontent.html");
mailJobLL.Send();
Using this approach means that it is entirely the responsibility of the user to provide the valid access token.
Alternatively, you can work with an application authentication, if you have the required permissions for the application. In this case, you’ll use:
mailJobLL.AdditionalOptions.Add("Graph.AuthType", "1");  // use app authentication

mailJobLL.AdditionalOptions.Add("Graph.SecretClientKeyId", "7538351a-fddf-41d9-b7b3-xxxxxxxxxxxx");  // app authentication only
mailJobLL.AdditionalOptions.Add("Graph.SecretClientKeyValue", "xxxxxxxxxxxx"); // app authentication only
In this case, it’s no longer required to transfer a bearer token.
In order to get a bearer token for user authentication at the right point, you can use the Microsoft libraries, for example.
PublicClientApplicationBuilder pcaConfig = PublicClientApplicationBuilder.Create(clientId)
                     .WithTenantId(tenantId)
                     .WithRedirectUri(redirectUri);
ClientApplication = (Microsoft.Identity.Client.PublicClientApplication)pcaConfig.Build();
var authResult = ClientApplication.AcquireTokenInteractive(new string[] { scope })
                .WithPrompt(Microsoft.Identity.Client.Prompt.ForceLogin)
                .WithLoginHint(userName)
                .ExecuteAsync().Result;
bearerToken = authResult.AccessToken;
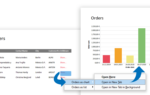
The result in Office 365 will look like this:


Leading the development at combit as Managing Director. Microsoft .NET enthusiast driving innovation & agile project management. Used to be a physicist in my first life. I love hiking and vanlife.