Generating Excel Formulas in Worksheets
There’s a new mode that allows to convert texts starting with “=” into Excel formulas in the resulting export. Adding this feature has been a frequent request from the community. This can both be enabled from the UI or via code – simply use
LL.ExportOptions.Add(LlExportOption.XlsAutoFormula, “1”);
to switch it on. A very simple task would then be e.g. to get the current date as calculated by Excel onto the sheet. Simply use the formula “=TODAY()” in a text object and make sure to format it as Date in order to appear with a date formatting in the resulting XLS as well:

Then, export to XLS. In the result, you get the cell as Excel formula:

Of course, this also works for the data only XLS export.
Password Protected Excel Sheets
Now you can optionally protect your sheets from being tampered with. There are a number of options to steer the behavior:
- XLS.Protection.ProtectSheets
Protects all sheets against editing.
- XLS.Protection.ProtectSheetsPassword
Optional password to remove the protection in Excel. If this password is not set, anyone can remove the protection with a simple click.
- XLS.Protection.ProtectSheetsMode
Defines the kind of protection – there’s a number of options to choose from. You can prevent cells from being selected, prevent rows and columns from being deleted, just protect cells from being formatted etc.
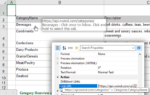
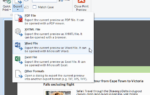
In Excel, a protected workbook displays this information in the backstage view, then

and can be unprotected from there (if you know the password 🙂 ).
Customizing the Header and Footer Area
The header and footer, that is added by Excel at print time, can now be set from code. This addition has also been a community request. To use this feature, simply set the required contents through a set of new options. A simple example would look like this:
LL.ExportOptions.Add(LlExportOption.XlsHeaderContent, "&Lcombit&CProducts&R&D");
LL.ExportOptions.Add(LlExportOption.XlsHeaderMargin, "0.1");
LL.ExportOptions.Add(LlExportOption.XlsFooterContent, "&CPage &P of &N");
LL.ExportOptions.Add(LlExportOption.XlsFooterMargin, "0.1");
Note the “strange” string in the first line – it’s actually easy once you get your head around it. &L denotes the start of the left column, you can add fixed text (like “combit” in the sample) or a wide range of other placeholders, e.g. for the date, sheet name, page number or file name of the XLS. The other sections are set via the &C (center) and &R (right) parts of the string.
The code above gives the following result in Excel’s print preview:

Autofit for column widths
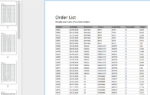
The data only export now uses Excel’s auto fit feature to determine the optimum column widths. This can be switched off if required. However, the result usually is much easier to read for the recipient, as all data is now automatically available at a glance:
Before:

After:

Wrapping Up
I’d like to take this opportunity and thank you all for your valuable input during the feature finding phase for each and every version of our reporting tool. It’s always great to see what’s really required “out in the field” and to make sure to react appropriately, like we did when extending the Excel export by popular demand. Without your support and ideas, the product wouldn’t be what it is today.
List & Label 28 ships with more than 30 new features. Learn more about the latest version of our reporting component.

Leading the development at combit as Managing Director. Microsoft .NET enthusiast driving innovation & agile project management. Used to be a physicist in my first life. I love hiking and vanlife.